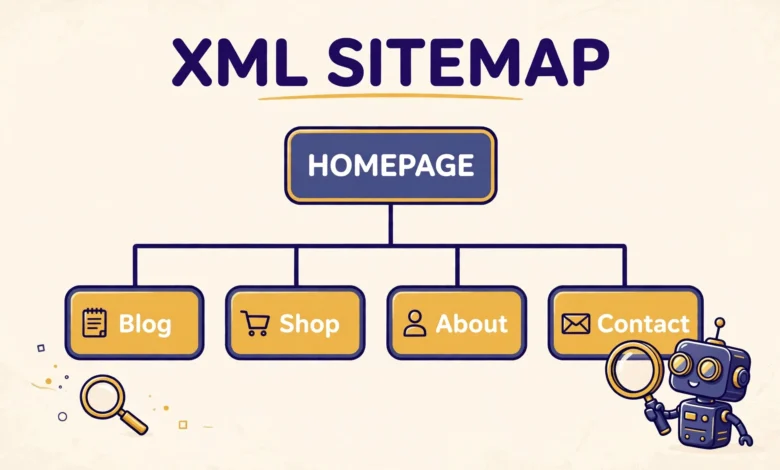
An XML sitemap is a simple file that lists the pages on your website and tells search engines where to find them. It does not rank your pages or write your content, but it helps Google discover new pages faster and understand which pages matter most. For a new WordPress site with few backlinks, a sitemap is one of the easiest technical wins you can set up.
The good news is that you may already have one. WordPress has generated a basic sitemap automatically since version 5.5, so many sites need no extra work at all. This guide explains when the built-in sitemap is enough, when a manual sitemap is worth the effort, and how to create one by hand or with a small code snippet. You will also learn how to submit it to Google Search Console and avoid the mistakes that make sitemaps useless.
What Is an XML Sitemap and Why Does It Matter?
An XML sitemap is a file, usually named sitemap.xml, written in a format search engines understand. It lists your important URLs, when each page was last updated, and how often it changes. Search engines use it as a map of your site, which is especially helpful when your internal linking is thin or your site is new and has few links from other websites.
- Discovery: Google finds new and updated pages faster, even before it follows links to them.
- Coverage: pages buried deep in your site structure still get noticed.
- Priority signals: lastmod dates tell Google which pages changed recently.
A sitemap does not guarantee that Google will index every page in it. Google still decides which pages deserve a place in its index based on content quality and usefulness. Think of a sitemap as an invitation, not a command. It opens the door, but the content still has to earn its place.
There is also an HTML sitemap, which is a page for human visitors that lists your posts and pages. It serves a different purpose from an XML sitemap, and the two work well together. If you want a visitor-friendly version too, our guide on how to add an HTML sitemap in WordPress without a plugin covers that setup.
Does WordPress Already Create a Sitemap for You?
Yes. Since WordPress 5.5, every WordPress site generates a basic XML sitemap automatically at yourdomain.com/wp-sitemap.xml. It includes your posts, pages, categories, tags, and author archives, and it updates itself whenever you publish or edit content. Open that URL in your browser to see yours right now.
For most small sites, the built-in sitemap is enough. It covers the content Google needs, it stays fresh without any work from you, and it follows the standard format. You only need a manual sitemap when the built-in one misses something important or when you want tighter control over exactly which URLs appear.
- Your site has custom post types or pages that the core sitemap does not include.
- You want to exclude certain pages, such as landing pages or thank you pages, from search results.
- You run a large site with thousands of URLs and need a sitemap index that splits them into groups.
- Your host or a plugin disables the core sitemap and you need a replacement.
If none of those apply, stop here and submit the built-in sitemap to Google Search Console using the steps near the end of this guide. The rest of this guide is for site owners who need more control than the core sitemap offers. The official sitemap standard at sitemaps.org explains the full format if you want to read the technical details.
Method 1: Create a Static Sitemap by Hand
A static sitemap is a plain XML file you write yourself and upload to your site root, so it lives at yourdomain.com/sitemap.xml. It suits small sites with pages that rarely change, because you must update the file by hand whenever you add or remove a page. If you publish new content every week, use Method 2 instead.
Open a plain text editor, such as Notepad or VS Code, and create a file named sitemap.xml with this structure. Replace the example URLs with your own, add one url block per page, and keep the list to your most important pages.
<?xml version="1.0" encoding="UTF-8"?>
<urlset xmlns="http://www.sitemaps.org/schemas/sitemap/0.9">
  <url>
    <loc>https://vutechgeek.com/</loc>
    <lastmod>2026-11-15</lastmod>
    <changefreq>weekly</changefreq>
    <priority>1.0</priority>
  </url>
  <url>
    <loc>https://vutechgeek.com/web-hosting/</loc>
    <lastmod>2026-11-01</lastmod>
    <changefreq>monthly</changefreq>
    <priority>0.8</priority>
  </url>
</urlset>
Upload the file to the root folder of your site, the same folder that holds wp-config.php. In cPanel, open File Manager, go to public_html, and use the Upload button. With FTP, connect with a client such as FileZilla and drag the file into the same folder. Then open yourdomain.com/sitemap.xml in your browser to confirm it loads.
Keep the file fresh. A static sitemap with old dates and missing pages is worse than no manual sitemap at all, because Google learns to trust it less. Set a monthly reminder to update it, or switch to the dynamic method below.
Method 2: Generate a Sitemap With a Small Code Snippet
A dynamic sitemap builds itself from your published posts every time Google requests it, so it never goes stale. Add this snippet to your child theme functions.php file or a code snippets plugin. It creates a custom sitemap at yourdomain.com/custom-sitemap.xml that lists your latest published posts.
add_action( 'init', function() {
    add_rewrite_rule( '^custom-sitemap\.xml$', 'index.php?custom_sitemap=1', 'top' );
} );

add_filter( 'query_vars', function( $vars ) {
    $vars[] = 'custom_sitemap';
    return $vars;
} );

add_action( 'template_redirect', function() {
    if ( get_query_var( 'custom_sitemap' ) ) {
        header( 'Content-Type: application/xml; charset=utf-8' );
        echo '<?xml version="1.0" encoding="UTF-8"?>' . "\n";
        echo '<urlset xmlns="http://www.sitemaps.org/schemas/sitemap/0.9">' . "\n";
        $posts = get_posts( array( 'numberposts' => 500, 'post_status' => 'publish' ) );
        foreach ( $posts as $post ) {
            echo '<url><loc>' . esc_url( get_permalink( $post ) ) . '</loc></url>' . "\n";
        }
        echo '</urlset>';
        exit;
    }
} );
After adding the snippet, visit Settings and then Permalinks in your dashboard and click Save Changes once. This refreshes the rewrite rules so WordPress recognises the new URL. Then open yourdomain.com/custom-sitemap.xml to check it loads. If you see a blank page or an error, check that the snippet was pasted into the active child theme, not the parent theme, because parent theme edits vanish on update.
This snippet is deliberately simple. It lists posts only, not pages or categories, and it caps the list at 500 posts. For a small blog that is plenty. If you need pages and custom post types too, a dedicated SEO plugin handles that better than a longer snippet. Google’s own guide on how to build and submit a sitemap covers the full format and the advanced options.
How Do You Submit Your Sitemap to Google Search Console?
A sitemap only helps once Google knows it exists. Open Google Search Console, select your property, and click Sitemaps in the left menu. Enter the sitemap address, such as wp-sitemap.xml or sitemap.xml, and click Submit. Google will fetch it within a few minutes and report how many URLs it found.
Check the status after a day or two. A status of Success means Google read the file. If you see errors, open the sitemap URL in your browser and look for broken XML, a 404 page, or a redirect. Fix the file, then submit it again. If you have not set up Search Console yet, our guide on how to add Google Search Console to WordPress walks through the verification step by step.
Bing has its own webmaster tools, and it accepts the same sitemap file. Submitting to both search engines takes only a few minutes and costs nothing.
What Mistakes Should You Avoid?
- Forgetting to submit: a sitemap sitting on your server without a submission is easy for Google to miss.
- Blocking the file in robots.txt: check that your robots.txt does not block the sitemap URL. Our guide on how to edit robots.txt in WordPress without a plugin shows where to check.
- Mixing two sitemaps: if you upload a manual sitemap, submit that one and ignore the core sitemap, so Google does not get conflicting signals.
- Letting a manual sitemap go stale: update it after every batch of new pages, or switch to a dynamic method.
- Listing pages you do not want indexed: tag pages, thin pages, and thank you pages usually do not belong in a sitemap.
- Submitting a sitemap full of broken links: remove URLs that return 404 errors before you submit.
The most common mistake is the simplest one: creating a sitemap and never submitting it. The file alone does nothing. Submit it, check the status, and revisit it after you publish new content.
Frequently Asked Questions
Does WordPress create an XML sitemap automatically?
Yes. WordPress has generated a basic XML sitemap since version 5.5, available at yourdomain.com/wp-sitemap.xml. It includes posts, pages, categories, tags, and author archives, and it updates itself. For most small sites, this built-in sitemap is enough.
Where do I upload a manual sitemap.xml file?
Upload it to the root folder of your site, the folder that holds wp-config.php. In cPanel that folder is usually public_html. After uploading, open yourdomain.com/sitemap.xml in your browser to confirm it loads, then submit it in Google Search Console.
How do I know if Google accepted my sitemap?
In Google Search Console, open the Sitemaps report and check the status. Success means Google read the file and counted the URLs inside it. If you see an error, open the sitemap URL, fix the problem, and submit it again.
Should I use a sitemap plugin instead of a manual sitemap?
A plugin is the easiest option for large or fast-growing sites, because it updates the sitemap automatically and includes pages, posts, and custom post types. A manual sitemap suits small, stable sites where you want full control and no extra plugin.
Last updated: November 2026.