A brand manager opens her inbox and finds forty creator pitches. She has ten minutes to shortlist five of them. She will not watch forty showreels or scroll through forty Instagram profiles. She will open the media kits, scan them for thirty seconds each, and pick the creators who make her decision easy. That is the whole job of a media kit: to make a busy stranger say yes, fast.
If you want to create a media kit as a creator in 2026, you do not need a design degree, an agency, or a huge following. You need a short, honest document that shows who you are, who your audience is, what you have done, and what you charge. This guide covers the seven sections every media kit needs, how to present your stats honestly, how to price your work, and how to build a solid first version in about twenty minutes. One honest note: a media kit does not guarantee brand deals. Small creators still have to pitch proactively and accept plenty of rejections, but a good kit turns hopeful messages into professional proposals.
What is a media kit?
A media kit is your resume and portfolio in one document, made for brands. It answers the three questions every brand asks before working with a creator: who are you, who watches or reads your content, and why should we trust you with our product? A good kit answers all three in under a minute.
Think of it as the difference between a cold DM that says “I love your brand, let us collaborate” and a pitch that arrives with a link to a clean, professional document. The first message asks the brand to do the research. The second does the research for them. Media kits are not only for influencers with a million followers: micro creators with 2,000 engaged followers regularly land paid deals, because brands care about fit and engagement far more than raw follower counts.
What are the 7 must-have sections?
1. Bio: who you are in three sentences
Open with a short bio that says who you are, what you create, and who it is for. Skip the life story. Three sentences are enough. Mention your niche clearly, because a brand selling skincare needs to know in seconds whether you talk about skincare or about everything. End with one line about what makes your content different, such as honest reviews, practical tutorials, or a specific community you serve.
2. Niche and content pillars
List your two or three content pillars: the topics you cover most often. A tech creator might list budget gadgets, honest reviews, and setup guides. A food creator might list quick weeknight recipes, street food, and kitchen tools. This section tells a brand whether your audience matches their customers, which matters more than your follower count.
3. Audience demographics
Show who your audience is: age range, gender split, top countries or cities, and interests. Pull these numbers from your platform analytics, not from guesses. Instagram, TikTok, and YouTube all show audience demographics for free. A brand selling products in Pakistan wants to see Pakistani followers. A brand targeting women aged 25 to 34 wants to see that age group in your audience. Honest demographics build trust faster than any follower number.
4. Platform metrics
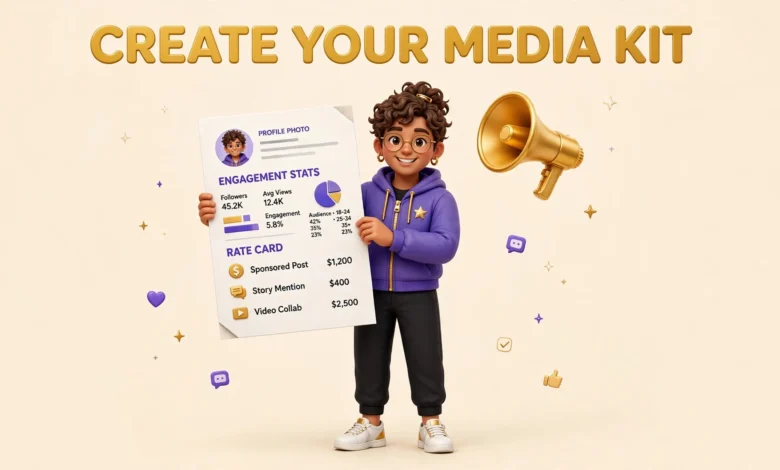
List each platform with your follower count, average views per post, and engagement rate. Lead with engagement rate, not follower count, because engagement is what a brand is actually buying. A 5 percent engagement rate on 5,000 followers beats a 1 percent rate on 50,000 followers. Include your best-performing recent posts as screenshots with their real numbers, so the brand sees proof instead of promises.
5. Content samples
Include three or four of your best pieces of content, with links or thumbnails. Choose samples that match the kind of work a brand would hire you for. If you want sponsored video deals, show your best videos. If you want product photography work, show your best photos. Quality beats quantity here. Four excellent samples say more than twenty average ones.
6. Past collaborations
List brands you have worked with, and label each one clearly as paid or gifted. This honesty protects you and impresses brands. A creator who labels a gifted product as gifted shows integrity, and brands notice. If you have no past collaborations yet, list the kind of work you have done instead, such as product reviews, tutorials, or community projects. Every creator starts with an empty section here, and brands understand that.
7. Services, rates, and contact
Close with what you offer, what it costs, and how to reach you. List your services: one Instagram reel, one TikTok video, a YouTube integration, a story set, or a UGC package. Include starting rates or a note that rates depend on scope, plus your email address and a link to your profiles. Make the contact details impossible to miss. A brand that has to hunt for your email will move on to the next creator.
How do you present your stats honestly?
Inflated numbers are the fastest way to ruin your reputation. Brands check: they look at your recent posts, compare your average likes and comments to your follower count, and ask for screenshots from your analytics. If the numbers in your kit do not match reality, the deal dies. Refresh your stats every one to three months, because your audience and engagement change as you grow, and a kit with six-month-old numbers looks neglected.
Use averages, not your best day. Your average views per reel over the last ten posts is an honest number. Your single viral post from three months ago is not. If your engagement is modest, say so and explain what your audience does well, such as asking questions, saving posts, or clicking links. Never buy followers or engagement: fake numbers are easy to spot, brands run audits, and getting caught ends the conversation permanently. A real audience of 2,000 beats a fake audience of 50,000 every time.
How should you design your media kit?
Use a free Canva template to start. Canva offers media kit templates that you can customize with your colors, fonts, and photos in under an hour. Pick a clean template with plenty of white space, and keep your branding consistent with your social profiles. Avoid cluttered designs, tiny text, and more than two fonts. Design for a thirty-second scan: use clear headings, short bullet points, and large numbers for your key stats.
Consider a live or interactive kit as well. Tools like Beacons.ai let you build a media kit page that updates automatically and includes your latest content and links. A live kit is useful when you pitch often, because you never send an outdated PDF. Many creators keep both: a live kit link for emails and pitches, and a dated PDF for brand forms that ask for a file upload.
How do you price your work in a media kit?
You have two choices for showing rates. The first is to list your starting rates directly in the kit, which saves time by filtering out brands that cannot afford you. The second is to list your services without prices and send a rate card only after you know the scope, which gives you room to adjust. Many creators do both: they list a starting rate in the kit and note that final pricing depends on deliverables, timeline, and usage rights.
Always charge extra for usage rights. If a brand wants to run your content as a paid ad, add 30 to 50 percent to your base rate, because paid ads give your content a much longer life and a much larger audience than an organic post. Agree on the usage period in writing, such as 30 or 90 days, and charge again if the brand wants to extend it. For a deeper look at pricing, read our guide on how to price sponsored posts as a creator.
How do you share your media kit?
Share your kit as one link, not as a heavy attachment. Upload the PDF to Google Drive or your website, set the sharing to anyone with the link, and paste that link into your pitch emails. A single link is easy to open on a phone, easy to forward to a colleague, and easy to track. Keep a dated PDF version ready for brand forms, named with your name and the current month, such as “YourName-Media-Kit-November-2026.pdf”, so the brand knows the numbers are fresh.
Include the kit link in your pitch email, not as an afterthought. Your pitch should be three short paragraphs: who you are, why you fit this brand, and what you propose. Do not wait for brands to find you. Small creators land most of their deals by pitching proactively: finding brands they genuinely use and sending a short, personalized email with their kit. Brands rank fit first and follower count last.
How do you build a media kit in 20 minutes?
If you have been putting off your media kit, here is a quick-start version you can finish today. Open a Canva media kit template and spend five minutes writing your bio and content pillars. Spend five minutes pulling your follower counts, average views, and engagement rate from your analytics. Spend five minutes adding your three best content samples and any past collaborations. Spend the last five minutes adding your services, starting rates, and contact details. Export it as a PDF and upload it to Drive. Done.
The quick-start kit will not be perfect, and that is fine. A simple kit you can send today is worth more than a beautiful kit you finish next month. You can improve it after every pitch, adding better samples and fresher numbers as you go. The creators who get brand deals are the ones who send the kit, follow up, and pitch again. If you are building from scratch, our guide on how to become a UGC creator with no experience covers the portfolio side, and our guide to growing on Instagram in 30 days will help you build the audience your kit showcases.
Frequently asked questions
Do I need a media kit if I have under 1,000 followers?
Yes. Brands work with nano creators precisely because their audiences are small and engaged. A media kit that shows a 7 percent engagement rate and a clear niche is more persuasive than a profile with 10,000 followers and no proof. Build the kit now, and your pitches will look professional from your very first outreach.
Should I include my rates in my media kit?
It depends on your strategy. Listing starting rates filters out brands that cannot afford you and speeds up the conversation. Hiding rates gives you flexibility to adjust based on the scope. A middle path works well for most creators: list a starting rate for your most common service and note that custom packages and usage rights are priced separately.
How often should I update my media kit?
Update your stats every one to three months, or whenever a big number changes, such as a viral post that doubles your average views. Also update it after every notable collaboration, so your past work section stays current. A kit with fresh numbers signals that you are active, professional, and paying attention.
Can I use Canva to make a media kit for free?
Yes. Canva offers free media kit templates that are good enough for a professional first kit, and you can export them as PDFs without paying. Paid features add more templates and brand controls, but they are not required. Spend your money on better content, not on design tools, until the deals start coming in.
Last updated: November 2026.