Typography is one of the fastest ways to make a WordPress site feel like your own. The default fonts that ship with most themes are safe, but they are also the same fonts thousands of other sites use. A custom font gives your headings and body text a distinct voice, and it costs nothing if you do it the right way.
In this guide you will learn four plugin-free ways to add custom fonts to WordPress, from the built-in Font Library to a hand-coded @font-face setup in a child theme. You will also learn how to host Google Fonts locally for better speed and privacy, how to check a font licence before you use it, and how to keep your font files small.
Why Add Custom Fonts to WordPress?
Fonts shape how visitors feel about your site before they read a single word. A clean geometric sans-serif feels modern, a serif feels editorial, and a handwritten display font feels personal. The right pairing makes your content easier to read and your brand easier to remember.
Custom fonts also help you stand out in a crowded niche. When every competitor uses the same theme defaults, your typography becomes part of your identity. The good news is that WordPress now includes built-in tools for managing fonts, so you no longer need a plugin to get a professional result.
There is one caution. Every font file you load adds weight to your pages, so the goal is to load only the fonts and weights you actually use. A site that loads six font families in twelve weights will feel slow no matter how good it looks. The methods in this guide keep your font loading lean on purpose.
Before You Start: Check the Font Licence
Before you upload any font, check its licence. Not every font you find online is free to use on a website, and using a commercial font without a licence can lead to a legal claim. Google Fonts is the safest starting point, because every font there is open source and free for commercial use.
If you buy a font from a foundry, read the licence terms carefully. A desktop licence does not always include web use, and a web licence often limits the number of monthly page views. Keep a copy of the licence file with your font files so you can prove you have the right to use it.
Always use the WOFF2 format for web fonts. It is the most compressed format, it is supported by all modern browsers, and a single WOFF2 file is often half the size of the older TTF or WOFF versions. If your font only comes as TTF or OTF, convert it to WOFF2 with a free converter before you upload it.
Method 1: Use the Font Library in the Site Editor
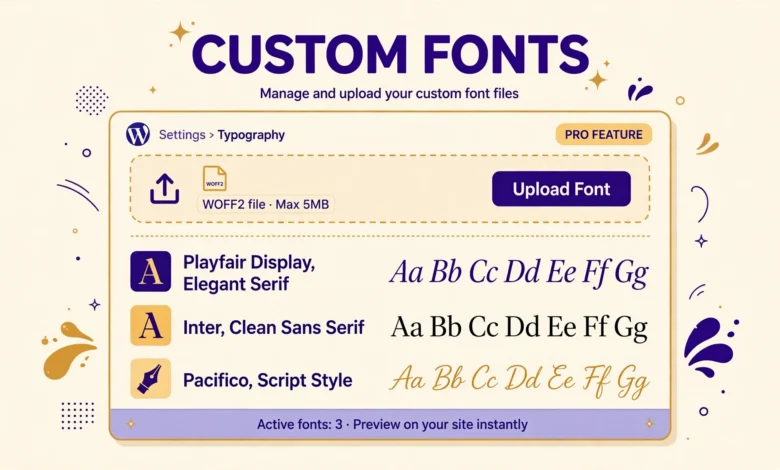
WordPress 6.5 added a built-in Font Library to the Site Editor, and it is the easiest plugin-free method for block themes. It lets you upload your own font files or install Google Fonts directly, and the fonts you add become available across the whole Site Editor.
How Do I Upload a Font With the Font Library?
- Go to Appearance, Editor, then open Styles and click the typography icon to open the font settings.
- Click Manage fonts, then open the Upload tab and choose your WOFF2 file from your computer.
- WordPress reads the font name and weight from the file automatically, so check that the details look correct.
- Click Upload, then select the font in the typography settings for your headings or body text.
The uploaded font is stored in your media library and served from your own server, which is good for both speed and privacy. You can upload several weights of the same family, but only upload the weights you plan to use.
How Do I Install Google Fonts From the Library?
The Font Library also includes an Install Fonts tab that connects to Google Fonts. Search for a font by name, pick the weights you need, and click Install. WordPress downloads the font files to your own server, so your visitors never connect to Google servers to load them.
This is a real advantage. Loading fonts from Google servers is convenient, but it adds an extra connection and raises privacy questions under European data rules. Installing the font locally avoids both problems. Our guide to using Google Fonts in WordPress without a plugin covers the privacy and performance trade-offs in more depth.
The Font Library only works with block themes. If you use a classic theme, skip to Method 2, which works everywhere.
Method 2: Add @font-face in a Child Theme
The @font-face method works on any theme, classic or block, and it gives you full control over how fonts load. The idea is simple: upload the font files to your child theme, declare them in CSS with @font-face, then apply the font family to your headings or body text.
Use a child theme for this, never the parent theme. Changes to a parent theme are lost when the theme updates, while a child theme keeps your customisations safe. If you have never made one, our guide to adding custom CSS in WordPress explains the child theme basics and where custom styles belong.
How Do I Upload the Font Files?
Create a fonts folder inside your child theme, for example wp-content/themes/your-child-theme/fonts, and upload your WOFF2 files there with an FTP client or your hosting file manager. Upload only the weights you need. A typical setup uses Regular 400 for body text and Bold 700 for headings, which means two files instead of eight.
How Do I Write the @font-face Code?
Add the following CSS to your child theme style.css file, replacing the font name and file names with your own. The font-display swap setting is important: it tells the browser to show a fallback font immediately and swap in your custom font when it arrives, so visitors never stare at invisible text while the font downloads.
@font-face {
    font-family: 'Inter';
    font-style: normal;
    font-weight: 400;
    font-display: swap;
    src: url('fonts/inter-regular.woff2') format('woff2');
}

@font-face {
    font-family: 'Inter';
    font-style: normal;
    font-weight: 700;
    font-display: swap;
    src: url('fonts/inter-bold.woff2') format('woff2');
}

body {
    font-family: 'Inter', sans-serif;
}

h1, h2, h3 {
    font-family: 'Inter', sans-serif;
    font-weight: 700;
}
Each weight needs its own @font-face block, because the browser treats each weight as a separate font file. After saving the CSS, clear any caching plugin and refresh your site to see the new font in action. The developer documentation at developer.wordpress.org covers @font-face and child theme structure in more detail.
Method 3: Register Fonts in theme.json
If you use a block theme, theme.json is the modern way to register fonts. It is a single configuration file in your theme folder that defines the font families, sizes, and weights available in the editor. Fonts registered this way appear in the typography controls for every block, which makes them easy to apply consistently.
Add a fontFamilies entry under settings, typography, with one object per font family. Each entry needs a slug, a name, and a fontFace array that points to your WOFF2 files. Here is a complete example for one font family with two weights.
{
    "settings": {
        "typography": {
            "fontFamilies": [
                {
                    "slug": "inter",
                    "name": "Inter",
                    "fontFamily": "'Inter', sans-serif",
                    "fontFace": [
                        {
                            "fontFamily": "Inter",
                            "fontWeight": "400",
                            "fontStyle": "normal",
                            "fontDisplay": "swap",
                            "src": [
                                "file:./assets/fonts/inter-regular.woff2"
                            ]
                        },
                        {
                            "fontFamily": "Inter",
                            "fontWeight": "700",
                            "fontStyle": "normal",
                            "fontDisplay": "swap",
                            "src": [
                                "file:./assets/fonts/inter-bold.woff2"
                            ]
                        }
                    ]
                }
            ]
        }
    }
}
Place the font files in your theme assets/fonts folder, then edit theme.json in a child theme so your changes survive updates. After saving, the Inter font will appear in the font dropdown for every block in the editor. This method takes a little more setup than the Font Library, but it gives you precise control over which fonts your editors can choose from.
Validate your JSON carefully after editing. A single missing comma breaks the whole file and can reset your theme styles, so check the file with a JSON validator before you save it. Keep a backup copy of the original theme.json so you can restore it quickly if something goes wrong.
Method 4: Self-Host Google Fonts Locally
Self-hosting Google Fonts means downloading the font files from Google and serving them from your own server instead of linking to fonts.googleapis.com. It is the best option for speed and privacy, and it is simpler than it sounds.
Start at fonts.google.com and pick your font. Use a helper site like google-webfonts-helper to download exactly the weights and character sets you need as WOFF2 files, along with the matching CSS. The helper generates clean @font-face code that you can paste into your child theme, following the Method 2 pattern above.
Only download the character sets your audience needs. The latin subset covers English and most Western European languages, and it is much smaller than the full font with every language included. Adding latin-extended, cyrillic, or greek subsets multiplies the file size, so include them only when your content actually uses those characters.
Self-hosting also removes a privacy concern. When fonts load from Google servers, Google receives the visitor IP address, which has led to fines under European GDPR rules. Hosting the files yourself keeps that data on your own server, and it removes a third-party request that can slow down your first page paint. Our web hosting guide explains how server location and caching affect font delivery speed.
What About Elementor Custom Fonts?
Elementor includes a Custom Fonts feature, but it is available only in Elementor Pro. If you pay for Pro, go to Elementor, Custom Fonts in your dashboard, upload your WOFF2 files, and the fonts become available in the Elementor typography controls. It is convenient, but it is not free.
Free Elementor users should use the theme or child theme methods above instead. A font loaded with @font-face in your child theme works inside Elementor just as well, because Elementor reads the fonts available on your site. Add the font family name in the Elementor typography controls, and Elementor will apply it to your headings and text widgets. Our guide to editing the header in Elementor free shows how far the free version can go with a little theme-level help.
How Do I Keep Custom Fonts Fast?
Fonts are render-blocking by nature, so a careless setup can delay your whole page. These habits keep the cost small.
- Load only the weights you use. Regular 400 and Bold 700 cover most designs, and each extra weight is another file to download.
- Always use font-display swap so text appears immediately in a fallback font while your custom font loads in the background.
- Preload your most important font file, usually the body text weight, with a preload link in your theme header. Preload only one or two files, because preloading too many hurts more than it helps.
- Use the latin subset only, unless your content needs other character sets.
- Set long browser caching for font files so repeat visitors load them from their own cache instead of downloading them again.
Test the result with PageSpeed Insights after adding your fonts. It reports font loading issues directly, including missing font-display settings and oversized font files, so you can fix the exact problem instead of guessing.
Frequently Asked Questions
Can I add custom fonts to WordPress without a plugin?
Yes. Block themes can use the built-in Font Library from WordPress 6.5, or register fonts in theme.json. Any theme can use @font-face in a child theme, which works everywhere and gives you full control over how fonts load.
What font format should I upload to WordPress?
Always use WOFF2. It is the most compressed web font format, it is supported by all modern browsers, and a WOFF2 file is often half the size of the older TTF or WOFF versions. Convert TTF or OTF files to WOFF2 before you upload them.
Is it legal to use Google Fonts on my website?
Yes. Every font on Google Fonts is open source and free for commercial use. Self-hosting the files on your own server is the safest option, because it avoids sending visitor data to Google servers and keeps your pages faster.
Why are my custom fonts not showing in Elementor free?
Elementor Custom Fonts is a Pro-only feature, so free users cannot upload fonts through Elementor itself. Load the font with @font-face in your child theme instead, then type the font family name into the Elementor typography controls. Elementor will apply it like any other font.
Last updated: November 2026.