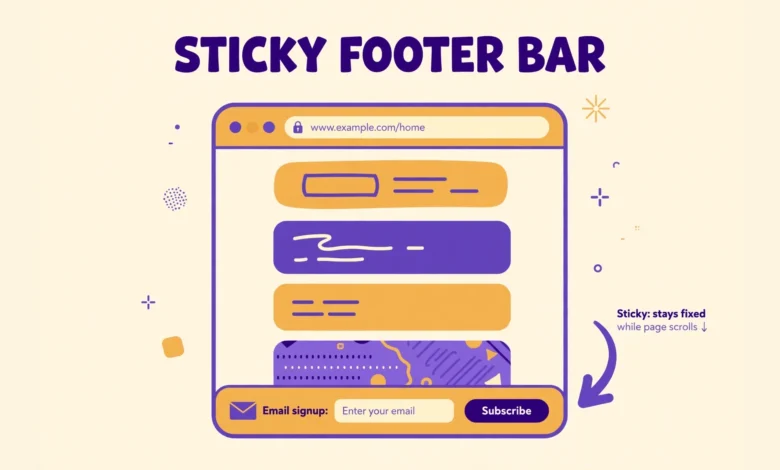
You have seen them on almost every site you visit: a thin bar fixed to the bottom of the screen that stays visible while you scroll, carrying a short message and a button. It might offer a discount, invite you to join a newsletter, or point visitors to a new post. That bar is a sticky footer bar, and it works because it is always in view without covering the main content. Best of all, you do not need a plugin to add one to WordPress. A small piece of HTML and CSS is enough.
This guide shows you how to add a sticky footer bar in WordPress without a plugin, using the Customizer and a free code snippets plugin for the HTML. You will learn what the bar should contain, how to style it for desktop and mobile, and how to add a close button so visitors can dismiss it. If you would rather use a plugin after all, there is a free alternative at the end, plus tips for keeping the bar fast and friendly.
What is a sticky footer bar and why should I use one?
A sticky footer bar is a narrow strip that sticks to the bottom of the browser window and stays there while the visitor scrolls. It is different from the normal footer at the bottom of a page, which disappears as soon as you scroll up. The sticky bar is always visible, which makes it perfect for one clear message and one clear action: a sale announcement, a newsletter signup link, a cookie notice, or a link to your most important page.
The reason it works so well is simple: it is visible on every page without interrupting the reading experience. A popup covers the content and annoys visitors, while a banner at the top pushes content down. A sticky footer bar sits quietly at the bottom of the screen and waits for the visitor to notice it. Keep the message short, keep the button clear, and use it for one goal only. A bar that tries to do three things at once does none of them well. If you want a similar element at the top of the page instead, our guide to the sticky header in Elementor free covers that option.
How do I add a sticky footer bar with HTML and CSS?
The no plugin method has two parts: a small piece of HTML that creates the bar, and a small piece of CSS that makes it stick to the bottom of the screen and look good. The HTML goes into your site through a hook, and the CSS goes into the Customizer. Splitting it this way keeps the content and the styling separate, which makes the bar easy to edit later. You only need to set this up once, and the bar will appear on every page.
Start with the CSS, because you can see the result as soon as the HTML is in place. Go to Appearance, then Customize, then Additional CSS in your WordPress dashboard, and paste the styles below. These styles fix the bar to the bottom of the screen, stretch it across the full width, and give it a dark background with white text and a bright button. Change the colors to match your theme.
.vutg-sticky-bar {
    position: fixed;
    bottom: 0;
    left: 0;
    width: 100%;
    z-index: 9999;
    background: #1a1a2e;
    color: #ffffff;
    text-align: center;
    padding: 14px 20px;
    box-sizing: border-box;
    font-size: 16px;
}
.vutg-sticky-bar a {
    display: inline-block;
    background: #f0b429;
    color: #1a1a2e;
    font-weight: 700;
    text-decoration: none;
    padding: 8px 18px;
    margin-left: 12px;
    border-radius: 4px;
}
.vutg-sticky-bar a:hover {
    background: #ffd34d;
}
The most important line in that CSS is position fixed with bottom zero. Fixed positioning takes the bar out of the normal page flow and pins it to the browser window, so it stays put while the rest of the page scrolls underneath. The z-index of 9999 makes sure the bar sits above your content instead of hiding behind it. The box sizing rule makes the padding count inside the full width, so the bar never causes a horizontal scrollbar. If your theme already has a fixed element at the bottom, such as a mobile menu, raise the bottom value slightly so the two do not overlap. For more styling ideas, read our guide to add custom CSS in WordPress.
How do I add the bar HTML with a code snippet?
With the CSS in place, you need the HTML for the bar itself. The cleanest way to add it without editing theme files is the free Code Snippets plugin, which lets you add a small PHP snippet that prints your HTML at the bottom of every page. Install and activate Code Snippets from Plugins, then Add New, and add a snippet that runs on the front end only. The snippet below hooks into wp_footer, the spot WordPress provides for content that loads just before the closing body tag. The hook is documented at developer.wordpress.org.
add_action( 'wp_footer', 'vutg_sticky_footer_bar' );
function vutg_sticky_footer_bar() {
    ?>
    <div class="vutg-sticky-bar" id="vutg-sticky-bar">
        Get 20% off our WordPress hosting guide
        <a href="https://vutechgeek.com/web-hosting/">Read the guide</a>
        <button type="button" id="vutg-bar-close" aria-label="Close bar">X</button>
    </div>
    <?php
}
Change the text, the link, and the button label to fit your own offer, and save the snippet with the option to run only on the front end. Visit your site and scroll down: the bar should sit at the bottom of the screen on every page. If you do not see it, check that the snippet is active and set to run on the front end, and clear any caching plugin cache. The link in the example points to our web hosting guide, but you can point yours anywhere.
Never add this kind of code by editing your theme files directly, because a theme update will wipe it out. The Code Snippets plugin keeps your code safe across updates, and it lets you turn the bar off with one click by deactivating the snippet. The same approach works for other small additions too, and our guide to add Google reCAPTCHA in WordPress without a plugin uses the same method for a different feature.
How do I add a close button to the sticky footer bar?
Every sticky bar needs a close button. Some visitors will not be interested in your offer, and a bar they cannot dismiss will annoy them and may push them to leave the site. The HTML in the previous section already includes a button with the ID vutg-bar-close. Now you need a tiny piece of JavaScript that hides the bar when the button is clicked.
add_action( 'wp_footer', 'vutg_sticky_bar_close_script' );
function vutg_sticky_bar_close_script() {
    ?>
    <script>
    document.getElementById( 'vutg-bar-close' ).addEventListener( 'click', function() {
        document.getElementById( 'vutg-sticky-bar' ).style.display = 'none';
    } );
    </script>
    <?php
}
Add this as a second snippet in Code Snippets, also set to run on the front end only. Clicking the close button now hides the bar for the rest of the visit. If you want the bar to stay hidden when the visitor returns, you can store a flag in the browser, but that needs a little more code and a cookie or local storage check. For most sites, hiding it for the current visit is enough. Style the button with a little extra CSS so it looks like a proper close control: a small circle with a dark background and white text at the right edge of the bar, big enough to tap easily on a phone.
How do I make the sticky footer bar look good on mobile?
On a phone screen the bar has very little room, so the desktop design will not fit as it is. A long message plus a button plus a close button can wrap into three lines and cover a large part of a small screen. The fix is a short media query in your Additional CSS that changes the bar on small screens: smaller text, tighter padding, and a button that sits below the message or becomes full width.
@media ( max-width: 600px ) {
    .vutg-sticky-bar {
        font-size: 14px;
        padding: 10px 12px;
    }
    .vutg-sticky-bar a {
        display: block;
        margin: 8px auto 0;
        max-width: 220px;
    }
}
Test the bar on a real phone, not only by shrinking your desktop browser window, because touch targets and font sizes feel different on a real device. Make sure the close button is big enough to tap, at least 40 pixels across, and that the bar never covers your mobile menu or a cookie notice. If your site already shows a cookie bar at the bottom, move the sticky bar up by setting its bottom value to the height of the cookie bar, or show only one of them at a time. Keep the message even shorter on mobile: five to eight words plus a button is plenty.
Is there a free plugin alternative for a sticky footer bar?
Yes. If you would rather not touch code at all, the free plugin WPFront Notification Bar does the same job with a settings page. Install it from Plugins, then Add New, then open its settings under the WPFront menu in the dashboard. You can type your message, set the button text and link, pick colors, and choose the bar position at the top or bottom. It also has a built in close button option and a setting to show the bar only on certain pages, which is handy if you want the offer on blog posts but not on the checkout page.
The plugin route is faster to set up and easier to hand to a client, but it adds another plugin to maintain and another settings screen to learn. The code route in this guide adds no plugin at all, loads almost nothing extra, and gives you full control over the design. Choose the plugin if you change the message often or manage the site for someone else, and choose the code route if you like keeping your plugin count low and your site fast. You can find WPFront Notification Bar and other free options in the plugin directory at WordPress.org. Either way, the bar should serve one goal, carry one button, and always offer a way to close it.
Frequently asked questions
Will a sticky footer bar slow down my WordPress site?
No, not in any way you would notice. The code version adds a few lines of HTML and CSS and a tiny script, with no extra requests and no external files. A plugin version adds a little more, but a single lightweight plugin is still a very small cost. Keep the bar simple and it will stay fast.
Can I show the sticky footer bar on some pages only?
Yes. With the code route, wrap the HTML output in a conditional tag such as is_single or is_page, so the bar only prints on posts or on one page. With the WPFront plugin, use its display rules to pick the pages where the bar appears. Showing the bar only where it is relevant usually gets more clicks and fewer annoyed visitors.
Does a sticky footer bar work with any WordPress theme?
Yes, as long as your theme calls wp_footer, which almost every theme does. The CSS uses fixed positioning, which works the same in any theme. If your theme already has a fixed bottom element, adjust the bottom value in the CSS so the two do not overlap.
Should the sticky footer bar appear on every page?
It can, but it does not have to. A bar that promotes a product makes sense on blog posts and the homepage, but it may distract visitors on the checkout or contact page. Start with every page, watch your clicks, and hide the bar from pages where it hurts conversions or gets in the way.
Last updated: November 2026.